IPv6 in your home via tunnel broker
Recently I parted ways with my ISP while they were too busy making bickering commercials to listen to my complaints. I joined a competitor with a very promising fiber service for our standards: Vodafone. With the switch, I got an upgrade to my old Thomson TG784n to a way better looking Technicolor TG784n v3 and with a newer firmware and loads more available documentation. It was some new documentation I came across that made me finally get around to do something I wanted. So here’s a quick little guide on how to configure IPv6 with proper internet connectivy for your home network via an IPv6 tunnel broker. I use hurricane electric’s tunnelbroker.net, but there are a few other alternatives you can use with this guide. This guide should also work fine for the Thomson TG784n. This guide presumes of course that you have already created an account with your tunnel broker and created and configured a tunnel with your internet connection as an endpoint. So since you’ve already registered and created a regular tunnel, you must have the following information at hand to proceed:
IPv6 Tunnel Endpoints:
Server IPv4 Address       216.101.81.40
Server IPv6 Address       2001:470:dea2:dead::1/64
Client IPv4 Address       5.1.0.1
Client IPv6 Address       2001:470:dea2:dead::2/64

Routed IPv6 Prefixes:
Routed /64                2001:470:dea3:dead::/64
You must also have root access in your equipment. This is disabled by default, and you must hack it in order to get more privileges. Here is the guide I followed. For reference, Server IPv4 Address refers to the tunnel broker’s end of the IPv4 connection the tunnel makes, and Client IPv4 Address is the Internet IP address of your home router. The IPv6 addresses are the same but for the tunneled protocol.Routed IPv6 Prefixes are the IPv6 prefixes that your router will give to your devices. If you are confused about why you get two different prefixes with hurricane electric’s tunnel service, there is a very good explanation here. Now let’s get our hands dirty. If you are afraid you’re going to fuck up, then maybe it’s best to backup your router configuration using ftp.
$ wget -r ftp://rootuser:rootpassword@dsldevice.lan
First you must add a tunnel interface. If your internet connection ip interface has a different name other than Internet, you should use it here.
=> tunnel 6in4 add ifname=6in4tunnel
=> tunnel 6in4 modify ifname=6in4tunnel sourceintf=Internet
   destination=216.101.81.40
You can use the following command to list the interfaces defined on your router.
=> interface list
Now, let’s add a new IPv6 route and IPv6 address to our router.
=> ip rtadd dst=::/0 intf=6in4tunnel
=> ip ipadd intf=LocalNetwork addr=2001:470:dea2:dead::2/128
   addroute=enabled
And next, we’ll add a nat template and a firewall rule that together ensures that incoming Protocol 41 IPv4 packets from your tunnel’s address (IPv6 Encapsulation) are handled correctly by your tunnel. The nat rule (template) makes sure packets keep your Internet address and the firewall rule accepts such packets. These two commands probably aren’t necessary unless your sink and sink_fire chains’ default behaviour is rejecting packets.
=> expr add name=6in4ipv4 type=ip addr=216.101.81.40
=> firewall rule add name=6in4 chain=sink_fire action=accept
   srcip=6in4ipv4 srcintf=wan state=enabled
=> nat tmpladd intf=GPON_Internet type=nat protocol=ipv6
   outside_addr=0.0.0.1 inside_addr=0.0.0.1 foreign_addr=216.101.81.40
Again, if your local network ip interface has a different name than mine, you should use it here. If you’ve survived up to here, then congratulations! Your router has an IPv6 address and should be able to communicate and receive communications to and from the IPv6 internet. Let’s try to ping the IPv6 address at the other end of the tunnel. You should see something like this.
=> ping proto=ip addr=2001:470:dea2:dead::1

Legend : Pingv6 successful(!)
         Pingv6 Timeout(.)
         Hit ctrl-g to abort...
!!!!!
--- Pingv6 statistics ---
5 packet(s) transmitted, 5 successful, 0% packet loss
rtt min/avg/max = 34 / 859030 / 4295000 ms
Your end of the tunnel can and should receive and reply to ping requests. But first you must enable and configure the ping responder service for IPv6: PINGv6_RESP.
=> service system modify name=PINGv6_RESP state=enabled
=> service system ifadd name PINGv6_RESP intf 6in4tunnel
=> service system ifadd name PINGv6_RESP intf LocalNetwork
With this you should be able to ping both IPv6 addresses of your tunnel. At this point you should be able to manually configure a default route and an IPv6 address on any computer in your LAN and have connectivity to the IPv6 Internet. You can also configure Router Advertisement so your router periodically announces to all hosts that it has an IPv6 prefix.
=> ip rt6advd ifdetach intf=LocalNetwork
=> ip rt6advd pfxadd intf=LocalNetwork prefix=2001:470:dea3:dead::/64
   vltime=2592000 pltime=604800 aflag=enabled lflag=enabled
=> ip rt6advd ifattach intf=LocalNetwork
You can check out these advertisements being sent using Wireshark:
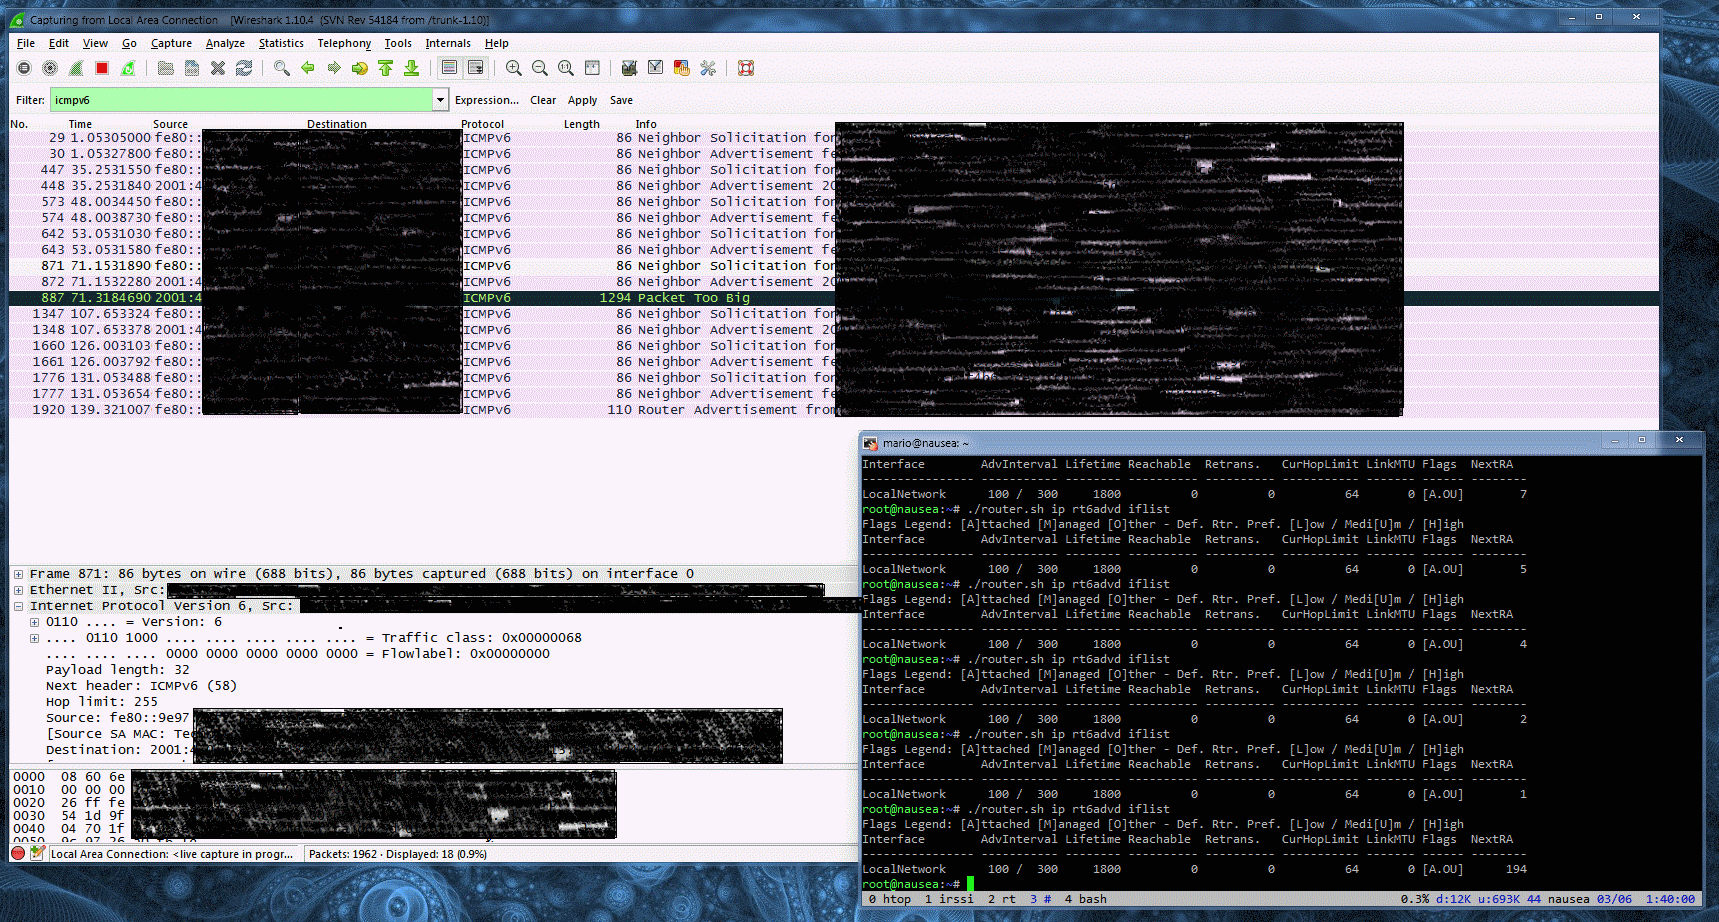
Lastly, the command:
=> ip rt6advd iflist
Will show you information on the status of the router advertisement. The NextRA is the time left in seconds between advertisements. Hosts will automatically configure themselves using this prefix and will have automatically configured IPv6 connectivity upon joining your network. For security reasons, your router’s default firewall policy will prevent all incoming IPv6 connections. Temporarily disabling the firewall or lowering the security level will show you that your hosts are reachable. I’ll leave more about this and hopefully how to allow connections through for a port or host for a future post.
IPv6 is indeed the future, but the certification badges he.net gives you to brag about sure look like a blast from the past:

